Pages

Tuesday, January 27, 2015

Mt. Rainier "Sunrise"

My art quilt is done.


My husband and I do a lot of hiking at Mt. Rainier and as a result, I get a lot of pictures that can only be seen if you are willing to hike.  The inspiration for this wall hanging is from this image.


I hand dyed and/or painted all the fabrics used in my wall hanging and it turned out really well! 

Saturday, January 24, 2015

Anna's Flower Garden

It's done and boy am I glad for that.   It turned out really cute but it was a LOT of work.  At one point, I really asked myself why I thought this was a good idea.  That was when I was about 3/4 of the way through putting the hexagons together and TIRED of them.  But I finished it.


With each completed project, I take some time to think about what worked and what didn't.  What I'd do differently, etc.  In this instance, I will readily tell you that it was my first and last "Flower Garden" quilt.  In person, it is really awesome to look at and feel.  But the piecing grew boring and tedious.  And even with an open-toe walking foot, it was hit or miss if the seams would end in the right spot.  As a result, I quilted it heavily so it won't decide to come undone with regular use.   I am finding that there are some projects where I really like the piecing but not the quilting and others work the opposite.  I didn't mind the quilting on this but it would have been better with the regular cotton batting I generally use.  However, I figured it would hide the "issues" I did not fix in the quilt top.  It mostly did.   I don't use extra puffy batting again though. 

After several quilting projects done, I am finding that I really enjoy piecing and quilting "art" quilts and I have one well under way currently.

Thursday, January 22, 2015

Nearly There

This is "Anna's Flower Garden."


I dare say this quilt has been my nemesis.  One of those "seemed like a good idea at the time."  Hexagons, ugh!  Putting the individual flowers together was fine.  But putting them all together was tedious!  And they did not come together without issue.  Most of those issues I did not fix.  I thought I'd quilt them out by using a super puffy batting and for the most part, that has worked to hide the imperfections well.  But I hate the puffy batting.  Mainly because of my tiny harp space in which to work with it.  And once quilted, it is very stiff under the arm of the machine.  This won't be an issue in everyday use for for quilting, it is a PITA! 

But as my husband says, this quilt is really adorable and awesome.  I am just thankful it is not huge like my past quilts have been.  And I will be really grateful when the quilting is done.  That part I am enjoying when the batting co-operates.  At any rate, my daughter hasn't seen this at all so it will be a complete surprise.  We have been working to really deep clean and reorganize her room this past weekend.  I was planning to save this quilt to give her for her birthday in late February but now I am thinking I will give it to her when her room is completely finished.   She has been working very hard to clean out and has been a good sport about all the things that went to the garbage.  So this will be a special treat I think.  And I'll just be glad to get it done!

Tuesday, January 20, 2015

Masters of the Undersea

This is the quilt I made for my 16 year old son for Christmas. 


My son has been really interested in the quilting process from the start of my quilting journey.  He begged me to give him "Traveling Stars."  I told him I'd make one specifically for him for Christmas.  He loves all things camo and orange.  The fish entered the picture when his previous store bought quilt with a fishing theme ended up in so many tatters that he packed it away for "memories."  I wanted to make him something that would, in a way, bring that quilt back to life.  This did.  He loves it.  I really enjoyed making it. 

The quilt top only took seven days to piece but the quilting took a month.  I see that as tons of practice and this quilt really put my free motion quilting into a new and better place.

Sunday, January 18, 2015

Done

Monsoon = done


Star Canvass = done


Now, on to Anna's Flower Garden, pieced and ready to baste.  Photos coming soon.

Wednesday, January 14, 2015

Monsoon

My son recently took an art class in high school.  He does not consider himself artistic in any way.  The projects required did not seem appropriate for a beginning art class at all which only added to his dismay.  One of the first projects was painting a still life.    He was really concerned about his ability to paint anything realistic so I suggested we sit down at the table together and just do a practice project and see where it took us.  This is what he came up with.


While this was not what the teacher had in mind for a still life, I really loved it.  It is probably the only painting my son will ever create.   As it was a warm-up project, we did not use good paper and thus it has already curled at the edges.   I did scan it into a computer folder for safe-keeping, however, I really wanted to have a lasting impression of this so I decided to make it into a quilted wall hanging.  Here is what I came up with.

Monsoon

This is my first quilted project inspired by art.  The rust, turquoise, and maroon/gray fabrics are from my hand-dyed hemp stash.  Remnants of other projects put into good use.   The rust and turquoise fabrics are hemp jerseys which I was a bit reluctant to use but once fused, they were quite a nice surprise.  They really puffed up well with quilting and there were no issues with stretch at all.  I have several other hand-dyed jerseys in my stash and after doing this little trial project, I am pondering a much larger one.

All that is left to do with "Monsoon" is to add binding and a hanger.  I already have a place picked out to display it.

You might be wondering what my son thinks of it.  First, he was astounded that I liked this picture so much that I'd even want to recreate it.  And second, he LOVES it.   Perhaps it will inspire him to paint something else.

This post is linked up with Freshly Pieced Modern Quilts WIP Wednesday.

Friday, January 9, 2015

Steady Progress

My "Star Canvass" quilt is coming along nicely.


I finished another flower yesterday.  Just three more to go.


I joined Christina Cameli's Craftsy class and am loving it.  I did not realize she was a midwife until joining the class but I recognize and appreciate the gentleness of spirit that she has.  I have the utmost respect for midwives and have found them to have that very same gentleness - I chose to have each of my four babies at home in the bathtub with my beloved midwife, Toni Erickson.  Sadly, Toni has passed on.  

Anyway, I have been pondering what to do with some of the blocks in this quilt and now I know.


The inner square is a paisley design I learned from Leah Day's Free Motion Project.  The outer design is asterisk string that I learned in Christina's class.  It works really well with the overall South West feel of this quilt.  And it is easy and fast to stitch.   The only thing left to decide is how to finish the stars.  I have some ideas on that but nothing solid.

I got a new lamp to sew with yesterday and am really happy with the lighting it provides.


The large silver lamp is the Tertial work lamp from Ikea.  It is perfect.  I had another clamp on work light but it was really old when I got it and it died.   Between the smaller lamp in the back and the Tertial lamp on the side, I can make shadows and light work well for seeing stitching.  I am excited to experiment more with lighting today as I continue to stitch on "Star Canvass."

Thursday, January 8, 2015

Working on "Star Canvass"

With a few large quilts under my belt and several smaller projects, I decided to make a wall hanging to go with "Interlude" that would give me a canvass to practice more free motion.  This is what I came up with.


I have already worked through all the aqua/rust colored squares with a paisley design.


Currently I am working through the large white squares with a floral design.


There are ten white squares.  I am done with 6, working on the 7th.


Flower done, pebbling comes next.

I am liking the look so far.  Several months ago, I did not think I could even make any object that would be recognizable in free motion.   With each quilting project done, I step back and ask myself what worked, what did not.  What would make the process better, easier, and more enjoyable?  And ultimately, what can I quilt.  What can "I" quilt that will look decent.  Even good?  Perhaps great?  I am finding that busy fabrics are not my friend.  I need to free motion with a contrasting thread in order to see what I am doing.  I didn't use contrasting threads at first because I wanted to hide all the ugly stitching.  But with several large projects finished, I have been feeling much bolder.  And as I look at "Star Canvass," I think, "This is where I am at right now.  This is what I can do."  And it is SO MUCH MORE than what I could do even last month so I am happy.  Is there room for improvement?  Yes, definitely.  But I am enjoying the process.

My husband says the stitching looks awesome!  But then he has said that all along.  Even from the beginning.  I called him out for being too nice.  I said, "Tell me the truth."  He said it was the truth.  On this project, he did say that it was far and away my best work.  I accept that.

I keep thinking all these projects are just practice for that great quilt I will make one day.  And I have some pretty good ideas of what that great quilt will look like.

Tuesday, January 6, 2015

Interlude

While I was working on "Traveling Stars," I was also working on the quilt top for my husband's and my bed.   I don't know why but I simply cannot do one project at a time.  Perhaps boredom?  Perhaps excitement?  Or both.  At any rate, while finishing up "Traveling Stars," I began piecing "Interlude."  As I mentioned in my previous post, I wanted to incorporate themes and colors my husband and I loved with themes and colors my son (in Heaven) had loved.  Themes were easy: stars and ducks.  Colors were not so easy to determine initially until I found a "cheater panel" with a duck on it that I liked.  I liked the country look and color scheme a lot and as it happened, it matched the colors in our bedroom perfectly so I was very excited to begin.  


I did not think a quilt full of small stars was the look I wanted on a king-sized bed so I made a gigantic star instead using the duck panel as the centerpiece.  This large block is 48"x48".  I did not have a pattern for the quilt I was making or even a clear and concise idea of what the finished quilt was going to look like.  I simply put this huge block together and let the rest of the designs for blocks fall into place as I went.  That is the quick way of saying that this quilt top made numerous trips from studio to bedroom in order to test out designs and colors.   And I must have called my husband into look and help me decide on every aspect of this quilt a hundred times. 


This is how it all came out.


"Interlude" ended up being an oversized king measuring 118"x108".  That measurement does not include the attached dust ruffle which was something I knew I was going to have on this quilt.  It took roughly two months to finish this quilt but as we were so excited to use it, we had it on our bed just after I had finished all the straight stitching I had planned to do on it.  

Piecing this top without a solid plan or a pattern required a lot of math work and some drafting of pattern pieces.  It stretched my sewing skills having to sew Y seams as well.  And again, there were several bo boos in this top but not to the degree of "Traveling Stars."  I could see much improvement moving from one quilt to the next both in piecing and in quilting.  I used my free motion foot for quilting this almost exclusively after some very quick and simple basting stitching.  I was determined to practice and I had a large canvass for which to practice on.  Too large in some instances.  It was both fun and frustrating to quilt this on a domestic sewing machine, but again, where there's a will, there's a way.  That said, I probably won't do another gigantic quilt any time soon.  

What I love so much about this quilt is that it is unique to us and our preferences.  That is what I have come to love so much about quilting.  I can make something unique to the person, whether myself or someone else.  It is a definite labor of love.


I named this quilt "Interlude" to mark the pause in time that occurs when a loved one is waiting in Heaven and another is waiting on earth to be reunited with them.  My son is always near to my heart and not a day goes by that I don't hope the interlude will be shorter than it feels.

Monday, January 5, 2015

This Started With a Garage Sale - Traveling Stars Quilt

Some of our neighbors get together each year and hold a large garage sale in the town square.  It's a three day event usually with many contributors.  My husband and I sometimes participate and other times simply go to hang out with the locals and browse the stashes.  This past summer when the sale was in progress, we went to browse.  One of our friends had brought some items to the sale which were went from absent family members on the off chance they would sell.  One of those items was a handmade king-size quilt.

I have always loved quilts.  A quilt was one of the very first purchases I made for my husband and my bed.  It was a commercially manufactured quilt that did not hold up well.   I did not know how to repair it and did not have a sewing machine at the time so it went off to the Goodwill.   Over the 20 years that followed, I purchased many more quilts, again, commercially made, but none for our bed specifically.  I used them instead for wall decor or kids bedding. 


When I spotted that handmade quilt at the garage sale, the desire to have another quilt for our bed hit me.  This particular quilt was in a color scheme that did not interest me but I inquired about the price anyway.   The asking price was $25.00 which seemed like a rip off to the maker.  It was a beautiful quilt and I could immediately see a huge difference in the amount of stitching it had vs. the store bought quilts I was used to.  I strongly considered buying it even though the colors were not my favorites.  But then I strongly considered making my own.  One with colors and themes that were of my choosing. 


I have been sewing for a living since 2002.  I sew easy things with the rationale that I am legally blind and there will simply be things I cannot sew such as clothing.   I tried to sew some clothing a few times many years ago.  It didn't turn out well.  So I quit trying.  I simply didn't want to sew clothing enough to attain the skills to do it right.  That is the truth of it.  Well, the mentality that certain sewing projects were unattainable for me due to low vision changed last summer when I determined that I would learn to piece and quilt my own king-size quilt.  (Yes, I made some nice clothing as side projects as well!)


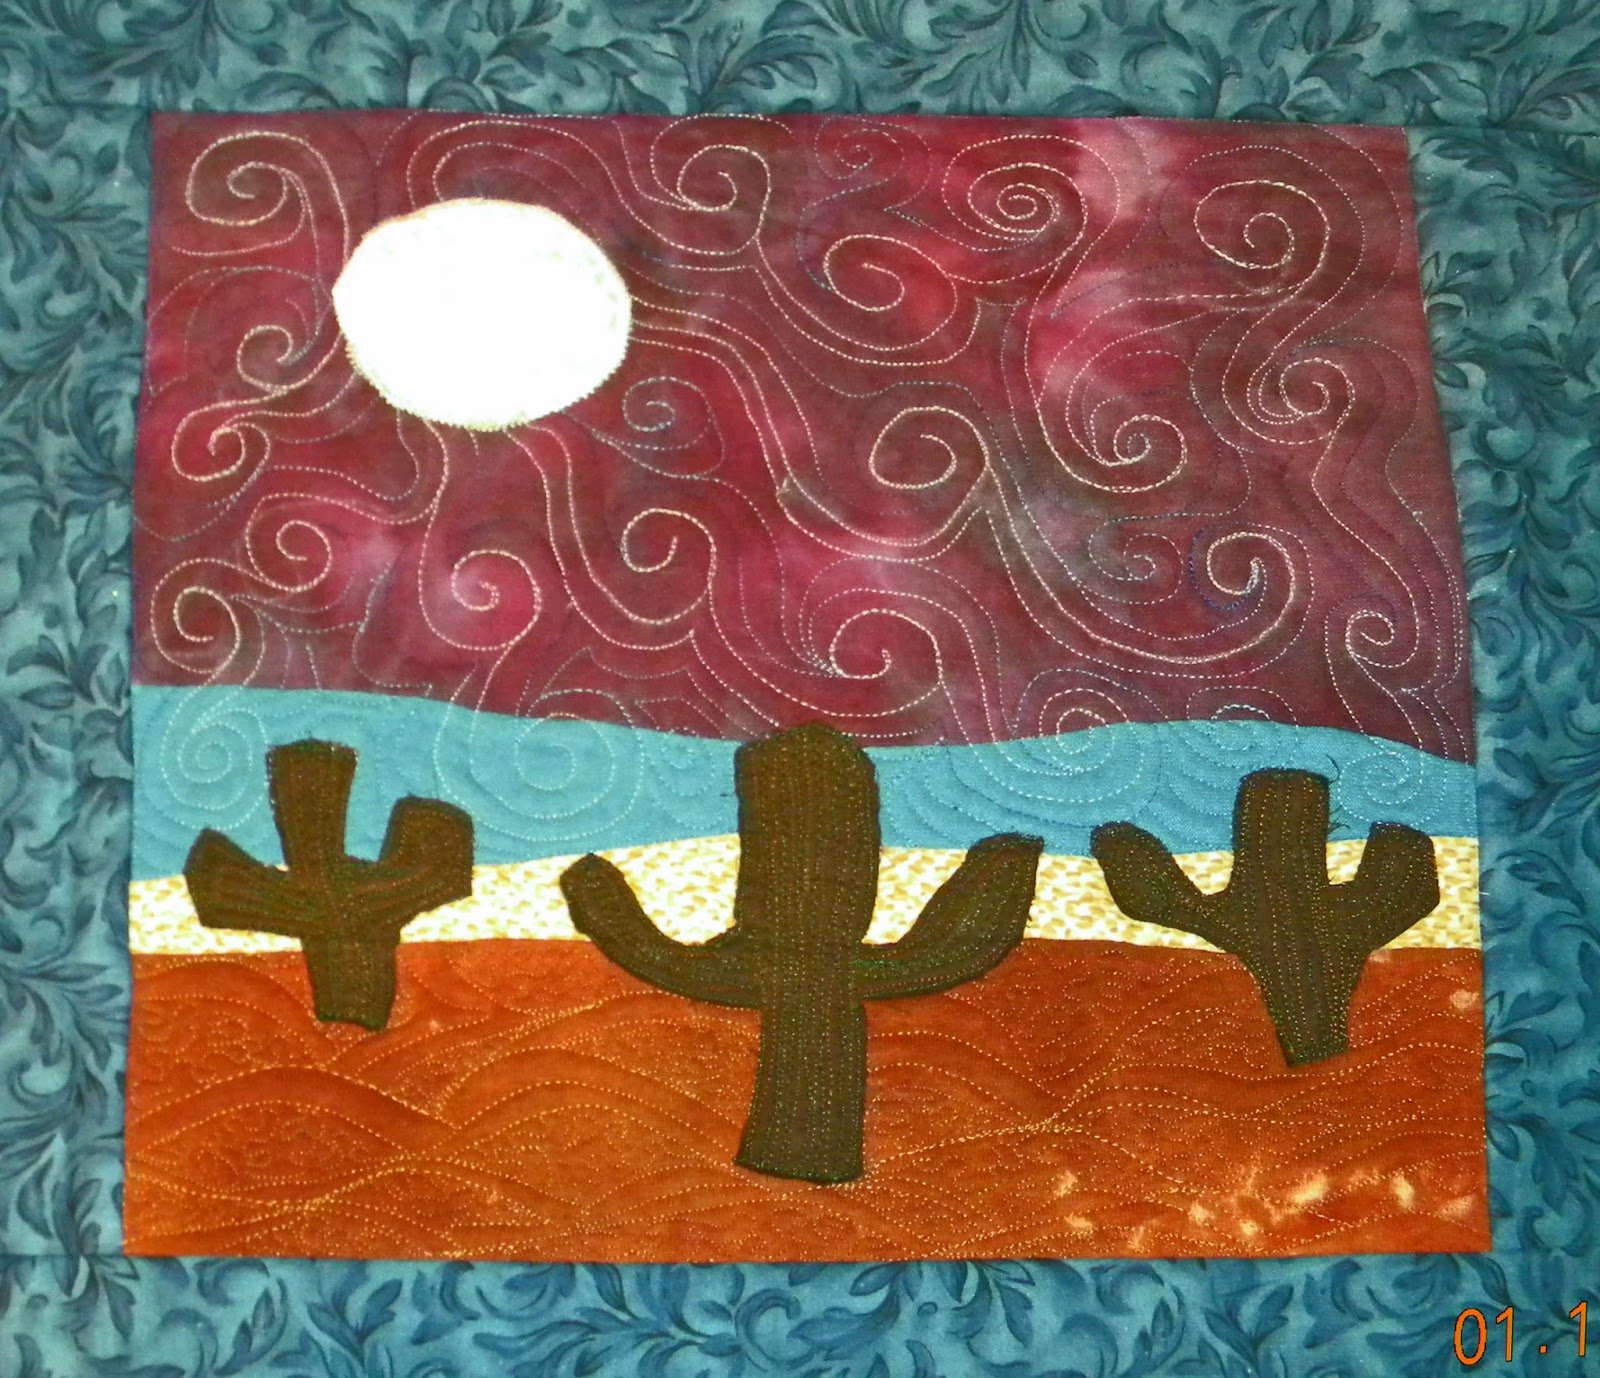
I had many different ideas on themes and colors for our quilt.  Cancer stole a young son from us nearly seven years ago and I wanted to make a quilt that would incorporate themes and colors he loved as well as themes and colors we love.  In short, I wanted our quilt to be unique to my husband, my son and me.  The colors I had in mind for this quilt were not colors I had in my current stash so while I waited for the correct fabrics to be in hand, I chose three fabrics I had a good supply of and went to work on a practice project.   


I knew our quilt would have a star theme so I began by making one star block, then another, and another and another.  I didn't want to make the same star over and over so tried to make as many variations of stars as I could using just the three fabrics.  I ran out of fabric after completing 15 stars.  What was once simply going to be a table runner had become a full-size bed quilt.  


I loved making those stars and became very personally attached to them as I was sewing them.  I even gave many of them names.  I had Sun Star, Chevron Star, Wonky Star, Diamond Star, Angry Star, Band-Aid Star, Double Band-Aid Star, Stained Glass Star, and more.  

None of these stars were perfectly pieced.  I expected this would be the case going in so I did not get overly upset about it.  I simply learned from each mistake.

My husband of 19 years was great at helping me trouble shoot many visual issues as they cropped up.  A lot of my seeing is done with my fingers, especially for piecing.  He helped me make some adjustments to my workspace so that I could see with both eyes and a few fingers too.

As I wasn't planning on making a bed quilt, I wasn't quite sure what to do with those 15 stars.  My husband suggested we should use this quilt in our travel trailer, hence the name for this quilt is "Traveling Stars."  This was a great plan because I had a surface in which to measure out the borders needed to cover the bed and finish the quilt.  Trailer beds are really oddly sized and the bedding we were using did not fit at all so the idea to make this for that bed seemed brilliant.

Most of my star blocks did not measure close enough to simply sew together.  My aim was to make 16 inch blocks and I had a couple of those and several more that were between 13.5 and 15.5.  I decided to sew sashing to each block making them equal to the 16 inches.  I then arranged them so the mismatches in sizes looked purposeful and when all was said and done, I loved the look of them.  Two fabrics were added for borders and then I set out to quilt it.

Because there were wonky stars and some very odd seams, the quilt top did not lay flat to start.  I did not know how to fix it so hoped I could ease some of this waviness out with quilting.  Some I was able to ease out and some I wasn't.  I was slightly disappointed but I learned what not to do next time.  After this quilt was finished and washed, a good portion of the pleats are hardly visible to a well-sighted person, my husband.    

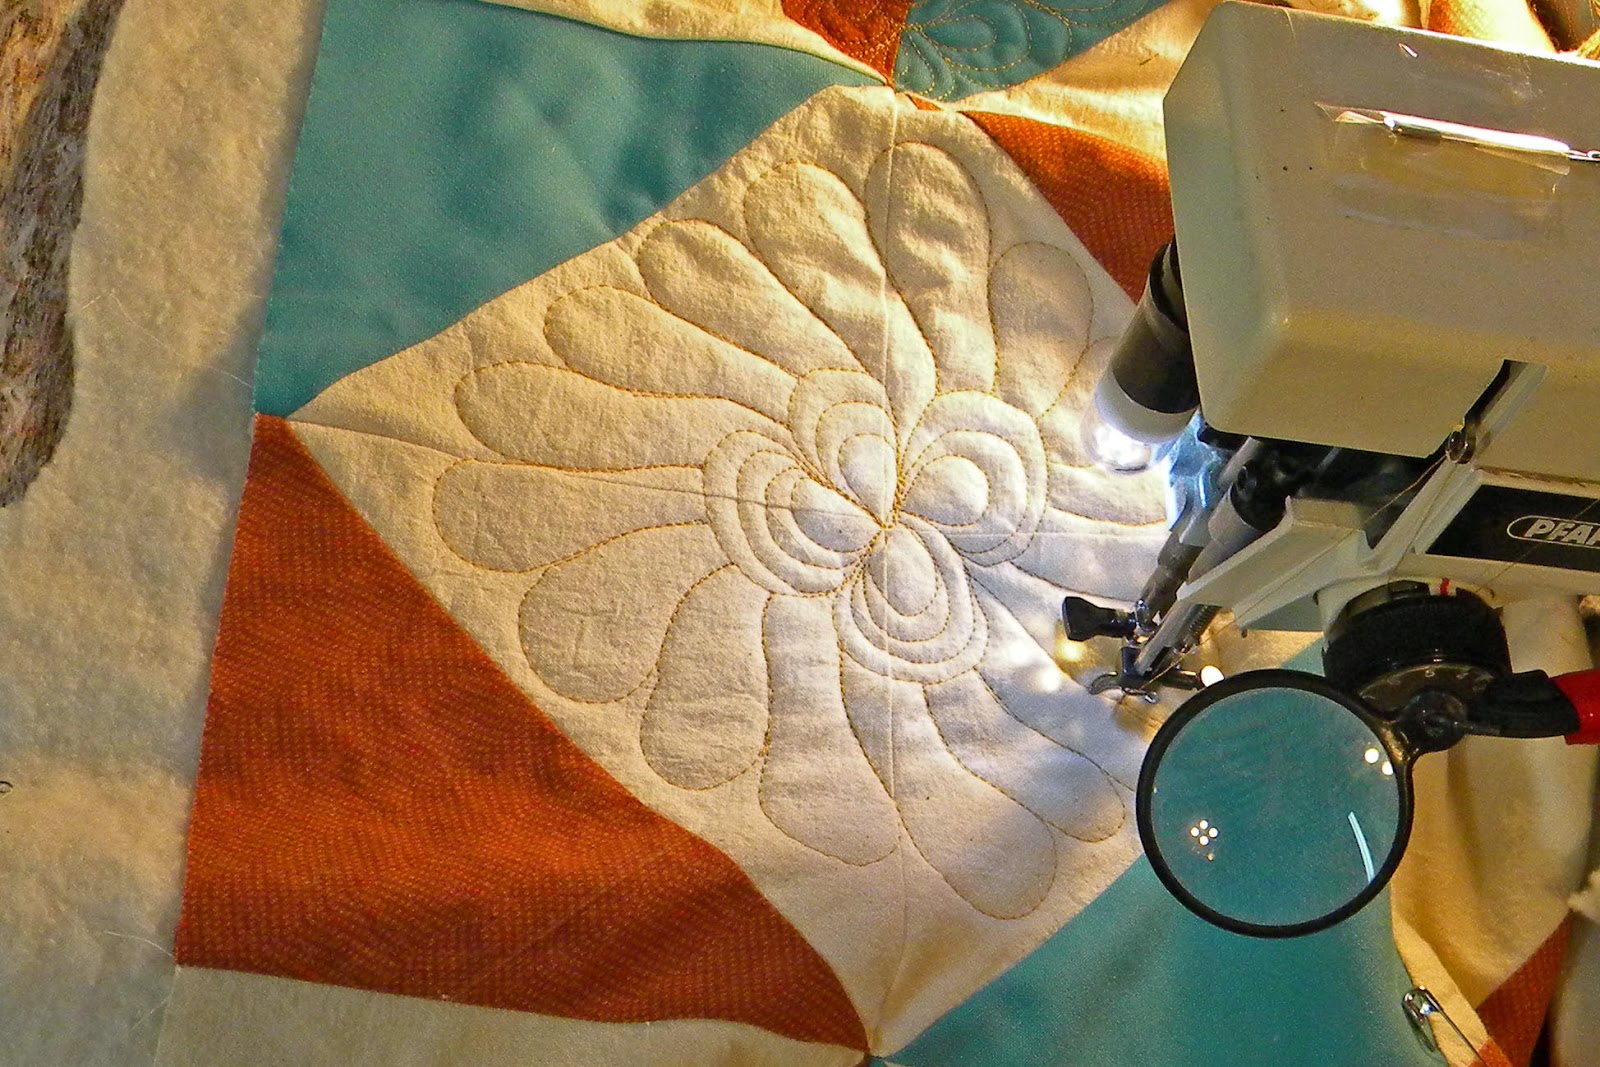
I quilted this first with a walking foot.  I cannot stitch in the ditch well at all - even with magnification.   So I opted to stitch to the side of all major joining seams.  I used a free motion foot in the outer border and for some of the stars with a lot of joints.  I chose to use invisible thread so that my ugly stitches in free motion would not be so visible but quickly found out that the invisible thread was invisible to me as well.  I could not see what I was stitching, or where I had previously been so that whole process was done by feel.

When I finished and turned the quilt over to the back where I did not use invisible thread, I found I had quilted in some interesting things.  A decorated Christmas tree and several dinosaurs that my son (in Heaven) would have truly appreciated.  I could not have done that purposely if I'd tried so it was a really special surprise.

I love this quilt.  After it was bound, I could hardly believe I did it.  It seemed surreal.  Every time I see it, I cannot help but smile.  And it fits the trailer bed perfectly!


Start to finish this quilt took about a month to complete.  I began in August, 2014, and finished in September.  And after that, I was absolutely addicted to quilting.  I am now working on quilt #4 and #5.  Posts for #2 and #3 coming soon.